Everything Blogging and Related Addictions

Tuesday, August 9, 2011

Blogger Template for Online Store Blog

If you are planning to have an online store or e-store with Blogger platform, then one thing important for you to consider is to search for a Blogger template that is suitable for an e-commerce blog. This template not only give you an opportunity to showcase your products on sale, but also it gives you feature such as shopping cart needed for an online store blog. There are not many Blogger template available for this kind of Blogger blog, but below it is a list of some. These templates are specifically designed for people looking for e-store Blogger templates.

RSS to JavaScript
Read full history - Blogger Template for Online Store Blog

Saturday, March 26, 2011

How to Add Related Post Widget to Your Blogger Blogspot Blog Posts

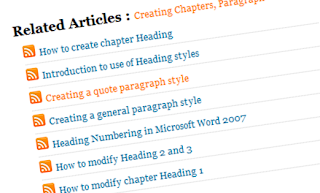
One way to make your readers feel convenient with your blog is to install related post widget. Related post will shows underneath your current full post with other posts that have the same label or category. So if you have many posts with the same category, chances are high for your readers to read some of those related posts. Remember that there is no other way to find related posts, unless readers click each category having some posts in it, which is may not be so convenient way for them. It is better to show them directly all other related posts under the current post they are reading. This is the job of related post widget.

See the image on the left to have a feel how this related post widget in action. This image is taken from a post of a blog implementing this related widget.

Follow this simple step to install the related post to your Blogger Blogspot blogs:
  1. Log in to your dashboard
  2. Select Design and HTML
  3. Back up your template by clicking Download Full Template (in case something funny happens or you change your mind)
  4. Select the box next to Expand Widget Template
  5. Search for </head> code
  6. Place the following code just underneath the </head> code
  7. <style> #related-posts { float : left; width : 540px; margin-top:20px; margin-left : 5px; margin-bottom:20px; font : 11px Verdana; margin-bottom:10px; } #related-posts .widget { list-style-type : none; margin : 5px 0 5px 0; padding : 0; } #related-posts .widget h2, #related-posts h2 { font-size : 20px; font-weight : normal; margin : 5px 7px 0; padding : 0 0 5px; } #related-posts a { text-decoration : none; } #related-posts a:hover { text-decoration : none; } #related-posts ul { border : medium none; margin : 10px; padding : 0; } #related-posts ul li { display : block; background : url("https://blogger.googleusercontent.com/img/b/R29vZ2xl/AVvXsEjjFoVuW1aEw86iCgFTRpcBjpxqM67bnX65L46XTYcBYpcSY3JeoEiaCF3opwrbdB8ywy-iB8XC2IDYUE71E87hUAyJqhRobpIVCV6ItFy2BEhYE643V6esuU7_X2vtVItCziRyVc1dOFM/") no-repeat 0 0; margin : 0; padding-top : 0; padding-right : 0; padding-bottom : 1px; padding-left : 21px; margin-bottom : 5px; line-height : 2em; border-bottom:1px dotted #cccccc; } </style> <script src='http://theblogtemplates.com/scripts/Related_posts_hack.js' type='text/javascript'/>
  8. Search for any of these code present in your template:  <data:post.body/> or <div class='post-body> or <data:post.body/>
  9. Add the following code beneath whichever the code in #7 you find
  10.  <b:if cond='data:blog.pageType == "item"'> <div id="related-posts"> <font face='Arial' size='3'><b>Related Posts : </b></font><font color='#FFFFFF'><b:loop values='data:post.labels' var='label'><data:label.name/><b:if cond='data:label.isLast != &quot;true&quot;'>,</b:if><b:if cond='data:blog.pageType == &quot;item&quot;'> <script expr:src='&quot;/feeds/posts/default/-/&quot; + data:label.name + &quot;?alt=json-in-script&amp;callback=related_results_labels&amp;max-results=5&quot;' type='text/javascript'/></b:if></b:loop> </font> <script type='text/javascript'> removeRelatedDuplicates(); printRelatedLabels(); </script> </div></b:if>
  11. Save you template. Preview the related post in action by selecting one post in a category or label having other posts.
Read full history - How to Add Related Post Widget to Your Blogger Blogspot Blog Posts

Friday, March 25, 2011

How to Add a Floating Social Bookmark Button to Your Blogger Blogspot Blogs

A floating social bookmark button is a very cool tools that you can try to install on your Blogger Blogspot blogs. One clear benefit of this floating social bookmark button over the static one is that your readers will continuously see the buttons so that they can hit anytime. The button will follow whenever your readers do scrolling on your blog. They do not have to search the button on your blog pages to find them as the case for static social bookmark button.

If you want to use this floating social button to your Blogger blog, here is how to:
  1. Log in to your blogger dashboard
  2. Select Design and then Page Element of the blog to which you want a floating social bookmark button
  3. Click Add a Gadget and select HTML/JavaScript in the appearing window
  4. Copy all code provided below and paste it into content box of your widget. Leave the title box blank
  5. Click Save
  6. Move the widget to under you post block
  7. Save and done.
The floating social bookmark button code (make sure you copy all the codes):
<!-- floating page sharer Start bloggersentral.com-->
<style>
#pageshare {position:fixed; bottom:15%; margin-left:-70px; float:left; border-radius:5px;-moz-border-radius:5px;-webkit-border-radius:5px;background-color:#fff;padding:0 0 2px 0;z-index:10;}
#pageshare .sbutton {float:left;clear:both;margin:5px 5px 0 5px;}
.fb_share_count_top {width:48px !important;}
.fb_share_count_top, .fb_share_count_inner {-moz-border-radius:3px;-webkit-border-radius:3px;}
.FBConnectButton_Small, .FBConnectButton_RTL_Small {width:49px !important; -moz-border-radius:3px;-webkit-border-radius:3px;}
.FBConnectButton_Small .FBConnectButton_Text {padding:2px 2px 3px !important;-moz-border-radius:3px;-webkit-border-radius:3px;font-size:8px;}
</style>
<div id='pageshare'>
<div class='sbutton' id='fb'>
<a name="fb_share" type="box_count" href="http://www.facebook.com/sharer.php">Share</a><script src="http://static.ak.fbcdn.net/connect.php/js/FB.Share" type="text/javascript"></script>
</div>
<div class='sbutton' id='rt'>
<script src="http://tweetmeme.com/i/scripts/button.js" type='text/javascript'></script>
</div>
<div class='sbutton' id='su'>
</div>
<div class='sbutton' id='digg'>
<script src='http://widgets.digg.com/buttons.js' type='text/javascript'></script>
<a class="DiggThisButton DiggMedium"></a>
</div>
<div class='sbutton' id='gb'>
<a class='google-buzz-button' data-button-style='normal-count' href='http://www.google.com/buzz/post' title='post on google buzz'>
<script src='http://www.google.com/buzz/api/button.js' type='text/javascript'></script>
</a></div>
<div style="clear: both;font-size: 9px;text-align:center;"><a href="http://www.bloggersentral.com/2010/07/install-floating-social-media-buttons.html">Get this</a></div>
</div>
<!-- floating page sharer End -->
Read full history - How to Add a Floating Social Bookmark Button to Your Blogger Blogspot Blogs

How to Install Disqus Comment Form on Your Blogger Blogspot Blogs

You can see in this blog that I am using the Disqus comment form to replace the original comment form provided by Blogger. Reason behind this is that because Disqus comment form looks more modern and professional compared to the original comment form. There are also some features that are not found in the original comment form, including real time commenting system, notification and reply system to your comments, inline media embedding, and mobile commenting. You will also be to managed all your comments from all your registered blogs through your Disqus Dashboard. And hopely with installed Disqus form, your blog readers will be more encouraged to post comments and get involve in the discussion.

You, too, can try this with your blogs. Installation is very easy and straightforward. You just need to go to Disqus website and register yourself. Follow the instructions provided by Disqus
Read full history - How to Install Disqus Comment Form on Your Blogger Blogspot Blogs

Tuesday, March 15, 2011

Free Social Bookmarks that Pay


Social Bookmark is  a great technique that you can use to store and share your articles or blog posts or anything else that interest you. It is also a very productive way of creating back links to your articles or blog posts giving more potential traffics.

What is more about social bookmark is that you can actually earn some money from the article your store and share. The way social bookmark sites do this is that they allow you to display Google adsense in those sites and any money you get because of your Google adsense will be shared with the owner of the social bookmark sites.

So, why not try this? You have nothing to loose by joining social bookmark that pay you. Below is a list of social bookmark sites that are ready to share Google adsense revenue with their users.  You can there if you want to register and please be ready with your own Google adsense ID publisher.
Read full history - Free Social Bookmarks that Pay